How to set up the Navigation Dock on the Huawei Mate 10 Pro

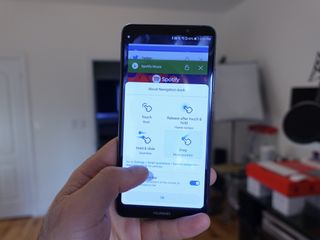
The Huawei Mate 10 Pro is a big phone with a large 6-inch screen, so why not take advantage of that entire display? With EMUI 8.0 on the Mate 10 Pro, Huawei has included a new feature called the navigation dock, a free-floating, moveable translucent button that goes anywhere you want it to. Its intuitive set of gestures recreate the standard back/home/multitasking dynamic of a traditional Android phone without tethering you to the bottom of the display. Here's how it works.
How to enable the navigation bar on the Huawei Mate 10 Pro
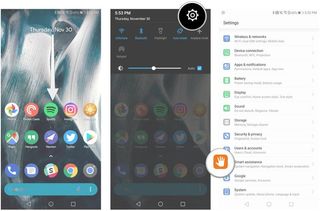
- On the home screen, swipe down on the navigation bar.
- Tap the menu button (cog icon).
- Scroll down and tap Smart assistance.

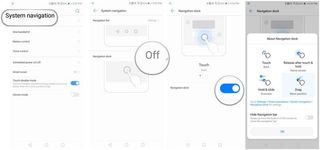
- Tap System navigation.
- Tap Navigation dock.
- Enable Navigation dock.
- The actual navigation dock can be moved around the screen. Tap and hold to move it around.
- Touch once to go to the previous screen.
- Hold for a moment on the navigation dock to return to the home screen.
- This is the hardest one: hold & slide to activate multitasking menu.

How to hide the navigation bar when navigation dock is enabled
- On the home screen, swipe down on the navigation bar.
- Tap the menu button (cog icon).
- Scroll down and tap Smart assistance.

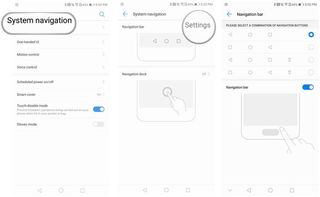
- Tap System navigation.
- Tap Navigation bar settings.
- This doesn't eliminate the navigation bar completely, but hides it until you swipe up from the bottom of the screen.
- This should be used alongside the navigation dock (above).

That's it! The beauty behind this system is its flexibility: it allows you to put the static home screen navigation buttons practically anywhere on the screen, opening up the entire 6-inch display of the Mate 10 Pro to whatever you want, from productivity to creativity to movies. It takes a bit of getting used to, but the navigation dock feels like second nature after a few minutes.
Be an expert in 5 minutes
Get the latest news from Android Central, your trusted companion in the world of Android
Daniel Bader was a former Android Central Editor-in-Chief and Executive Editor for iMore and Windows Central.

